
(Last updated on: November 6, 2020)
PLEASE NOTE: These instructions are for those who host their data locally. If Center Stage Software hosts your data, please click here for directions.
- On the client computer (workstation), find the Tix7 folder using Windows FILE explorer (it should be C:/Tix7).
- Inside the Tix7 folder is a file called SQLRDD.INI.
- Open that file (the file should automatically open in Notepad).
- The file contains the following command string:
ConnString=MySQL<dataXX.centerstageticketing.com>;UID=username;PWD=userpassword;DTB=<name of database>
- Enter the fixed (static) IP address of your Wintix server computer.
- You need a static IP address. Ninety-nine per cent of Windows internet users use what are called “dynamic” IP addresses. That means each time you restart your computer or refresh your internet connection, you are assigned an IP address to use when you connect. The next time you connect, you might get a different IP address. If you want to connect to the server computer from a client (workstation), you’ll need a static IP address. A static IP is assigned by your ISP or Internet Service Provider to you permanently. It will not change when you restart or refresh.
- The other option, if it works on your network, is to use the server computer NAME in place of the IP address. Since the computer name will never change, you won’t have to worry about getting the static IP.
- NOTE: This may not work on all networks.
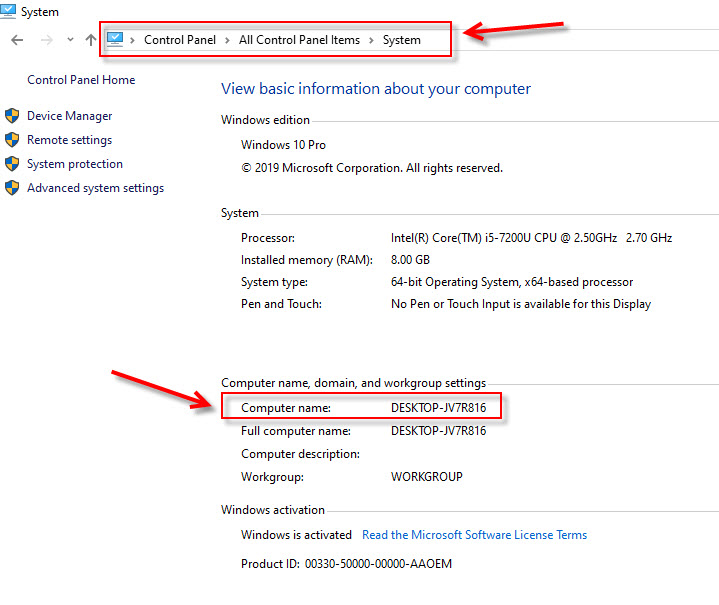
- You can find your computer name by going to Control Panel | System and Security | System.
- Enter the username and password. (These can be found on the server computer in C: | Tix7 | SQLRDD.INI).
- The connection string in SQLRDD.ini will look like this (but with your own credentials):
ConnString=MySQL=Twila-HP;UID=wintixuser;PWD=wintixuser;DTB=tix7 (using server computer name)
OR
ConnString=MySQL=192.168.0.2;UID=wintixuser;PWD=wintixuser;DTB=tix7 (using server IP address)
- Save the file.
- You should now be able to open Wintix and see your data.