
(Last updated on: October 19, 2017)
- Go to Sales | Regular sale. The Selling a ticket window appears:
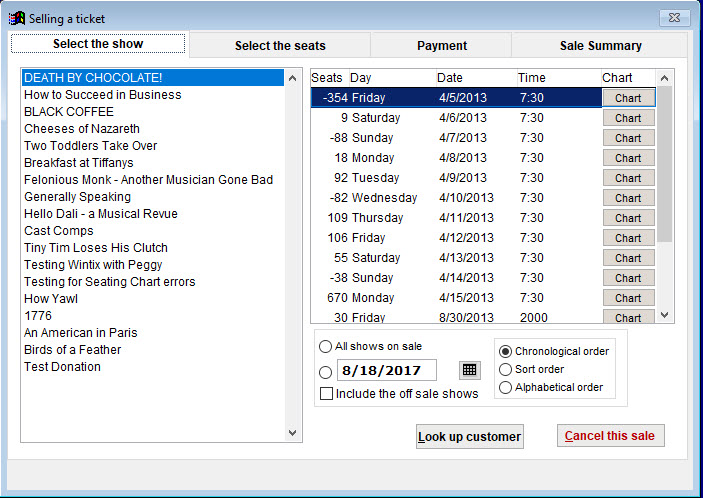
- Note the four tabs across the top of the window. These tabs indicate the steps used to complete a regular sale: Select the show, Select the seats, Payment, and Finish the sale.
- On the right bottom, there are several radio buttons and a check box that given you display options.
- The list box on the left indicates all shows that are available for sale.
- Click on each show. As you select a show, the individual performances for the show appear in the list box on the right. Click on a performance to select it for sale, then click the Select the seats tab to view the seating chart for that performance. If it is general admission, you will be able to select the number of tickets.
- Wintix 6 also features a seating chart preview. Click on the Chart button to quickly see the availability for a performance.
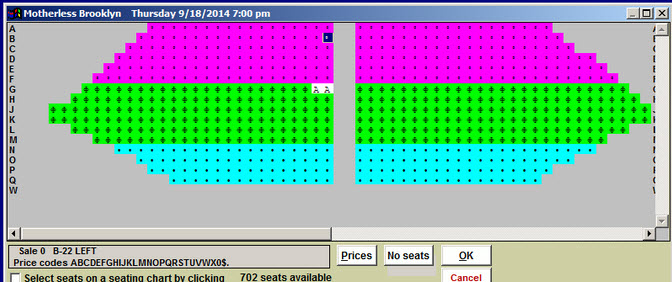
Selling Seats from a Chart (see above screen shot)
Our imaginary customer wants two seats in left section towards the front on the center aisle. So, you make the decision that they will want row B.
Tip To get a larger view of the seating chart, click on the maximize window button on the title bar.- Notice that the seat location, B-22 Left, is displayed in the seat status box in the bottom left of the Seating chart window. A list of all valid price codes is also displayed.
Our customer wants one Adult (A) and one Teen (B) ticket.
Note: Click the Prices button to see a description of the available price codes for this performance. The Price detail window appears:
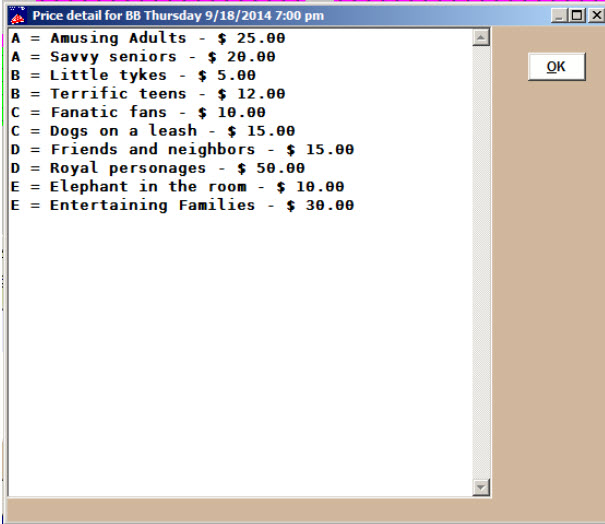
Unlimited price categories
- Wintix 6 has unlimited price categories. You can have as many “A,” “B,” “C,” etc. categories as you want. In this example, you can see there are two price categories for each category A.
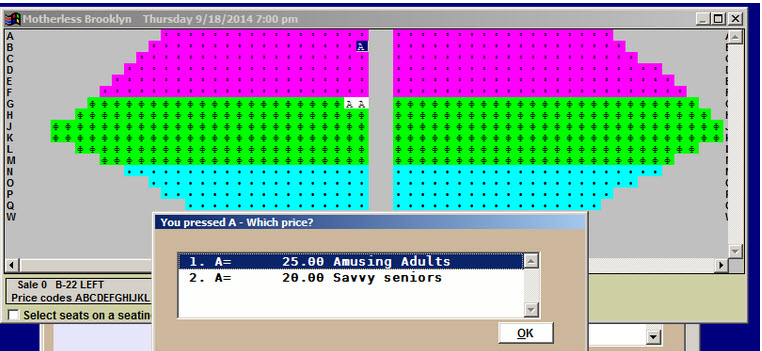
- Click the OK button to return to the Seating chart window. When you return to the Seating chart window, re-select the seats you want to sell.
- Since we have two category A price codes and our customer wants an Adult ticket, we typed A = Amusing Adults and press okay. If you have only one price category, Wintix will take you to the Payment tab.
Selecting a block of seats:
- At some time, you might want to sell a block of seats (group sale). To do this, right click on one corner of the block then right click on the opposite corner. The program will select the seats in between. You will then select the price code to put in.
- Once you have selected all your seats and pressed OK, Wintix takes you to the Payment tab.
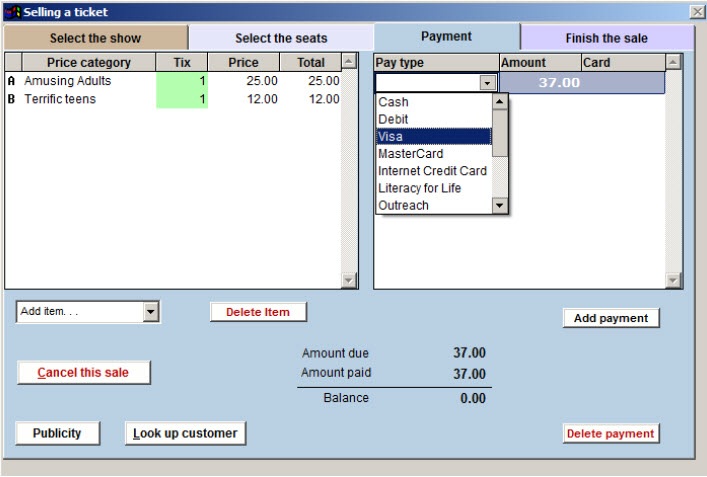
Make Payment for a Sale
- Use the drop down menu under pay type to select which form of payment your customer will use.
- In this case, our customer will pay with a Visa card. When you select a credit card, a Process button will appear. When you click on the button the Credit card data window appears.
- Depending on how you are set up, you can choose to manually enter the card number or swipe the card.
Split payment
- Wintix 6 allows your customer to split payments between different payment types very simply. If the total owed is $37, and the customer wants to pay $20 by cash and $17 by check, select Cash from the Pay type drop down menu, then type in $20.
- Click the Add payment button, select check, then type in $17.
Add items
- The payment screen also allows you to add other items, such as donations, service charges, or merchandise.
Finish the sale
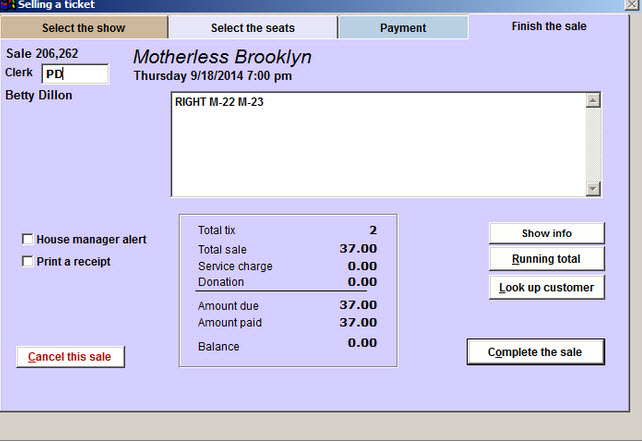
- Click on the Finish the sale tab. A recap of the sale appears.
- Enter your first name (or initials) in the Clerk field. You now have a chance to verify that all the sale information is correct.
- Note: This would be a good time to read all the sale information back to your customer, because it all appears in this window!
Select a Customer
- You can now enter the customer’s name and address for this sale.
- Click on the Look up customer button. The Searching the customer table window appears.
- Enter either our customer’s last name, Montegue or first name, Romeo. The window should now look like this because he is a new customer.
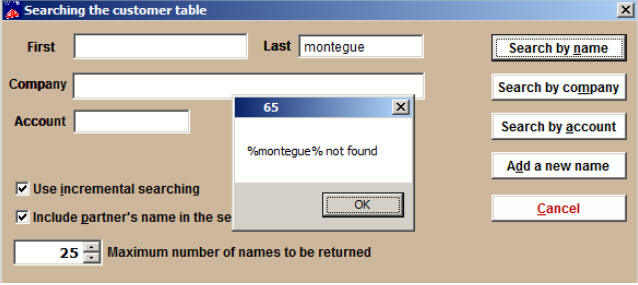
- If you have checked Use incremental searching in File | Initialization | Mailing list, Wintix will begin to autofill as letters are matched. If you don’t have that checked, you must click the Search by name button.
- Click OK and delete the name you have put into the field.
- Click on the Add a new name button. The Customer information window appears:
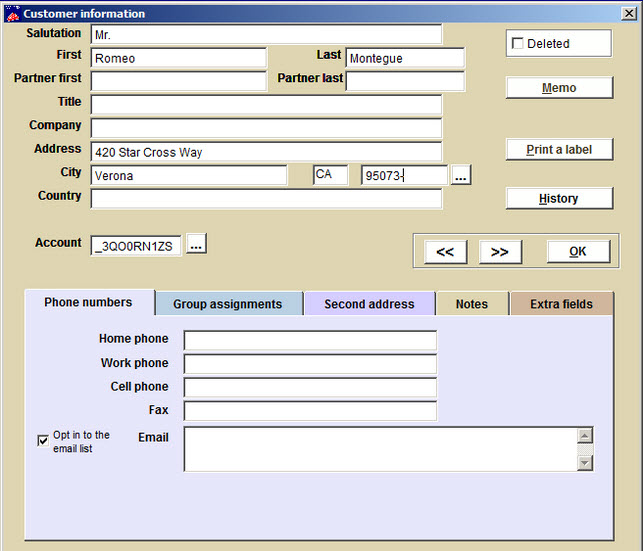
- Enter the customer information. Note that Wintix has automatically assigned an account number.
- When you enter the street address and press enter on your keyboard, Wintix automatically advances to the zip code field. When you enter the 4- or 9-digit zip code, Wintix suggests a city from its zip code database. If the city that appears is not the one you want, type over it.
You can browse through other customer records by clicking on the navigation buttons above the Notes tab.
- When your new customer information is entered correctly, click on the OK button to close the Customer information window.
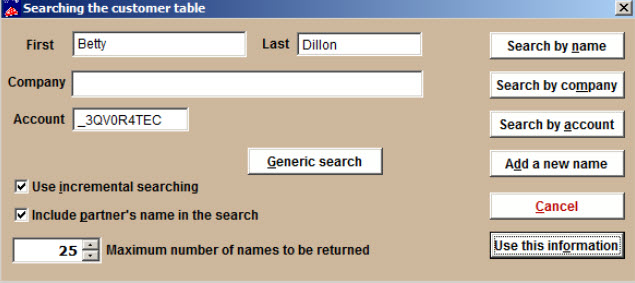
- Wintix takes you back to the Searching the customer table window. Click Use this information.
- The Finish the sale tab (now called the Sale summary tab) in the Selling a ticket window appears:
- If you want to email a receipt, click on the Print a receipt checkbox.
- When the receipt window pops up click Email- email tickets and click Print the receipt.
- If the patron has an email in their information it will automatically be in the Sent to field.
- Click on the Complete the sale button.
The How did they hear about it? window appears:
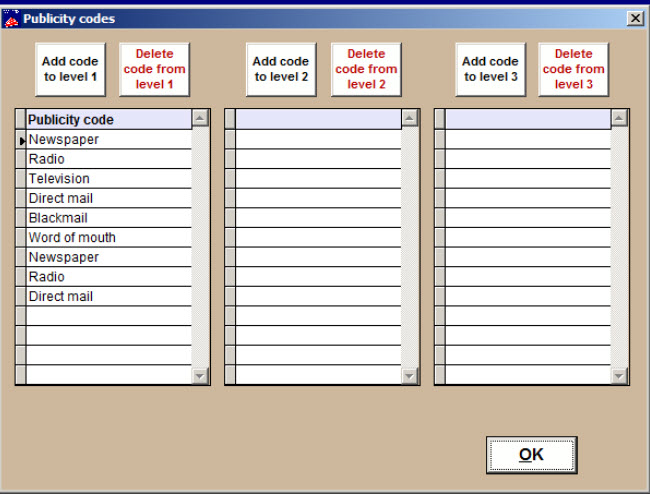
- When you click on a category in the Publicity code column (on the left,) the column on the right will list your choices for the selected heading. Select one of the choices in the column on the right and click on the OK button.
- You can also add and delete publicity codes in this window.
- The Ticket printing window appears:
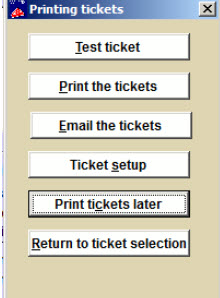
- Make your choice, then you will see the Completed sale window.
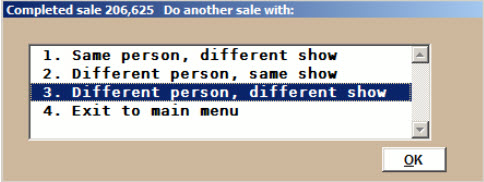
The sale is complete. What do you want to do now?
- To return to the Main Wintix Window, click on #4. To make an additional sale with the same customer, you would click on #1 to keep the current customer information, etc.
Congratulations! You have completed a Regular sale!