
This document will help you set up your Datamax S Class 3210 or 3306 thermal printer. We hope the following instructions are clear. If, for any reason, the operator cannot successfully set up the printer and be able to print a test ticket within the Windows operating system, please call Datamax-O’Neil Corporation’s support hotline at 407-523-5540. Datamax-O’Neil is open Monday through Friday from 8 am to 6 pm Eastern Time. Identify yourself as a customer of Center Stage Software. There will be no additional cost for support.
For additional assistance in setting up the printer within Wintix Box Office Accounting software, please call our support line at 831-920-1254 or email support@centerstage.com. Support hours are Monday through Friday from 12 pm to 8 pm Pacific time. Client must be a current user of Center Stage Software with a support contract in place. If the support contract has expired, client may renew his/her support contract by contacting Center Stage Software at 831-583-0641 or info@centerstage.com.
Setup instructions for the printer are as follows:
1. Unpack the printer and plug in the power cord and plug into power source.
2. Connect printer cable to printer and computer (most likely a USB printer cable – may or may not be included).
3. Power on the printer. Power button is located on the rear of the printer.
4. Use the key that is included with the printer to unlock the printer lid.
5. Put the ticket stock in and adjust the ticket guide by loosening and tightening the thumbscrew (to the bottom right of the ticket guide).
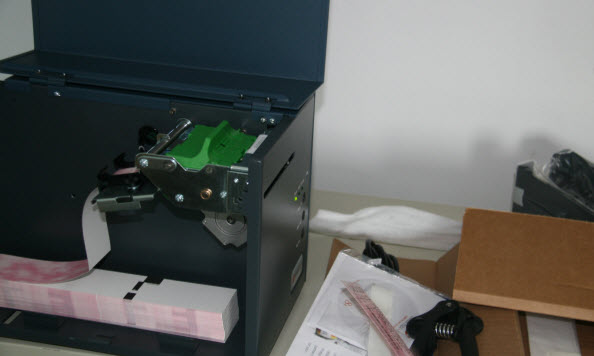
6. To feed the ticket stock through the printhead, you must first unlock the green latch (all the way back to unlock). Once unlocked, lift the green latch upward in order to feed the ticket.
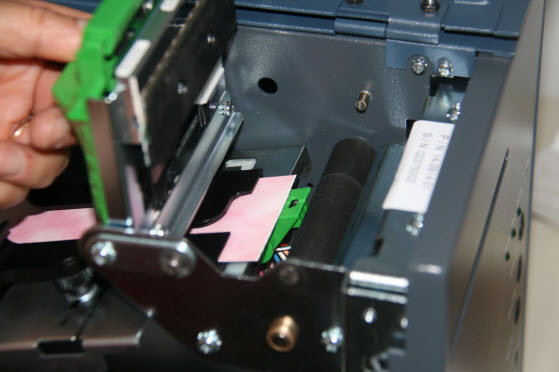
7. Once the ticket has been fed, close the green latch and lock it by pushing the latch toward the front of the printer to lock in place).
8. Power on the printer and wait until it is online (about 20 seconds).
9. If your tickets have been loaded inside your printer, and you have powered on the printer, the ticket will be grabbed by the printer, then pulled in and calibrated.
10. The printer is ready to work. Try printing a test ticket. (See # 2 under the heading: Printer Buttons and What They Do at the end of this post.)
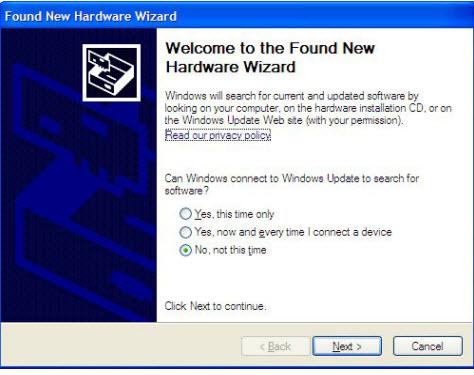
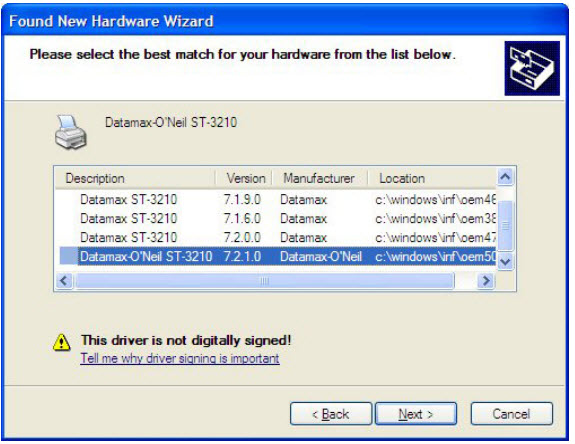
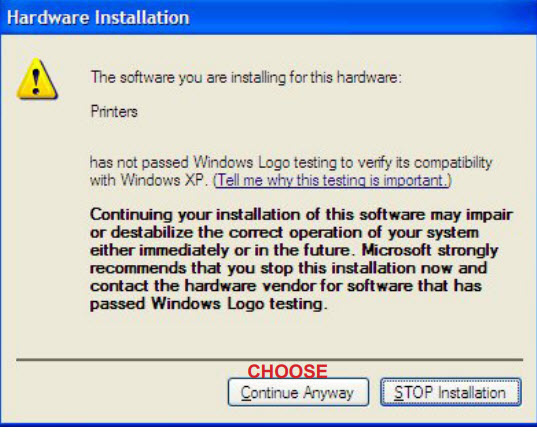
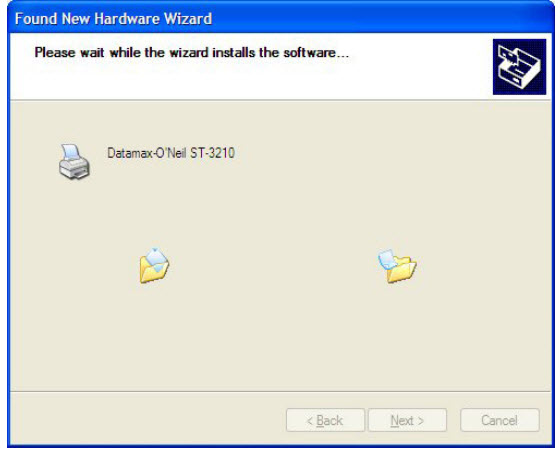
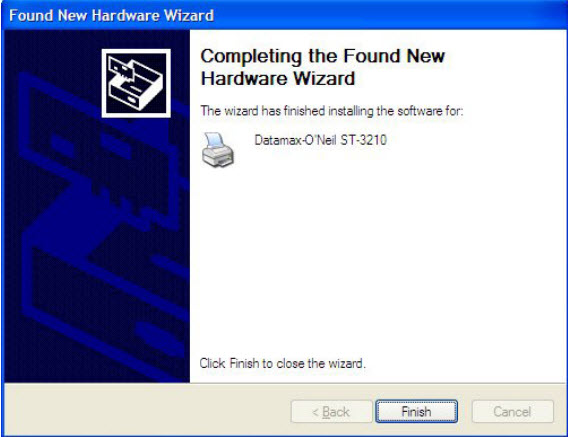
11. When connecting new hardware to your PC computer, you will see the following Wizard screens. Please follow the wizard screen shot recommendations below (this is for the 3210, but is done the same way for 3306).

Install the print driver
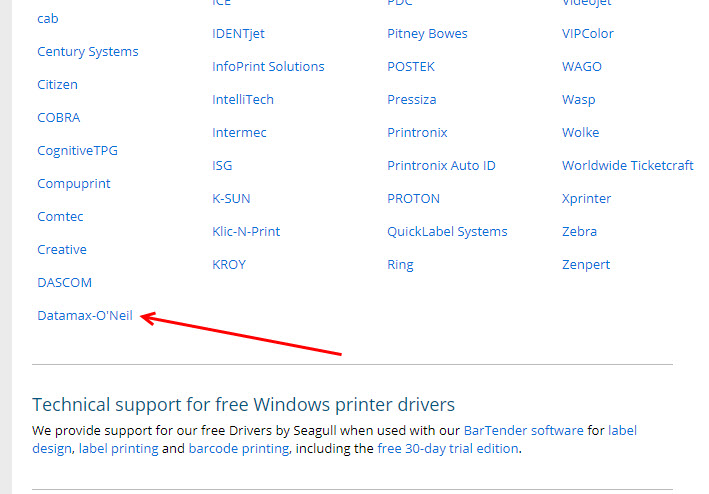
We recommend downloading the latest Datamax driver from Seagull Scientific:
http://www.seagullscientific.com/aspx/free-windows-printer-drivers-download.aspx
- Scroll down the page until you see the following list. Click on the “Datamax-O’Neil” link and you will be able to download the correct driver and save the DatamaxX.X.X.exe file to your local computer drive.
- Once copied, you need to install the driver.
- If you need help at his point, please call Datamax-O’Neil Corporation’s support hotline at 407-523-5540 and obtain assistance in installing the Datamax printer driver.
Printer buttons and what they do:
1. The Pause/F1 button takes the printer off-line and online.
2. To print a test ticket, turn the printer off-line and press the Test ticket/F3 button.
3. To print a configuration ticket (you never know when someone may ask for one):
press the F2 button on the printer and F3 button on the printer at the same time.
4. Press the F2 button twice and you will get to the parser mode. Press the F1 button
and you want the parser mode to be DPL for Windows printing.
Switching to FGL printing – and back again:
The “S” class is their top-of-the-line, high speed, heavy duty, direct thermal printer. It defaults to being in “auto” mode. That means it is supposed to automatically switch between FGL (text mode) and DPL (Windows mode). Ninety percent of the time auto mode works as advertised. When it is not working, you need to tell the printer explicitly how to work.
• Press and release the F1 key to take it off-line (indicated by the on-line going out).
• Press and hold the F2 key until the on-line light lights. Release it. Printer will spit out a ticket saying “Stock ID”.
• Press and release the F2 key until you get the desired mode (“parser mode”). It should be twice.
• Toggle between “Auto, DPL and DTPL” using the F1 and F3 keys. Select the DTPL mode (Auto mode seems to be unreliable). DPL mode is used for Windows printing to the printer.
• Once the selection is made, press and hold the F2 until the on-line light comes on and release it.
• Start printing.