
Creating a detailed, accurate seating plan is a vital step to selling tickets with a reserved seating plan. While not difficult, it can be pain-staking, tedious work filled with many nuances that must be precisely performed.
Center Stage Software will input your first seating plan and we highly recommend that you have us create any additional ones you need for a nominal fee.
If you do create your own seating plan, you need to become well acquainted with the Plan tools button. Using these tools will save you valuable time and ensure your seating plan is correct.
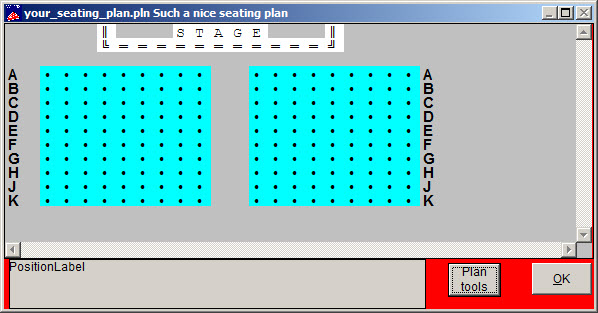
In your seating plan, you will see the Plan tools button at the bottom right of the window.
When you click on the button, the Plan tools window opens and you are on the Operation tab. Let’s go through the buttons one by one, then we will discuss the Re-assign tab.
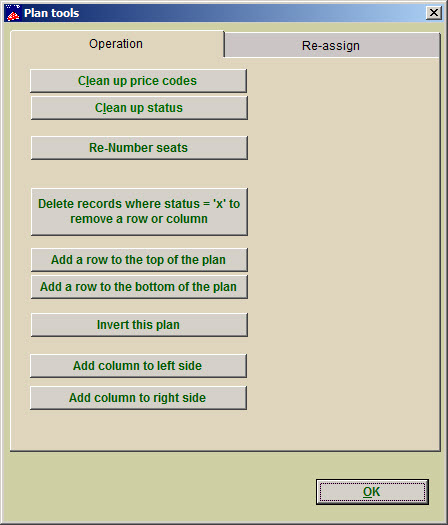
- Clean up price codes
- This function works by looking for cells in the seating plan where the status is blank. When a blank status is found, the seat number, section, and valid price codes are made blank.
- Use this button AFTER you have built your seating plan but BEFORE you add any descriptive text like the word “Stage.”
- Clean up status
- This function works by looking for cells in the seating plan where the price code is blank. When a blank price code is found, the seat number, section, and status are made blank.
- Use this button AFTER you have built your seating plan but BEFORE you add any descriptive text like the word “Stage.”
- Re-number seats
- This is a common way to number the seats in each row.
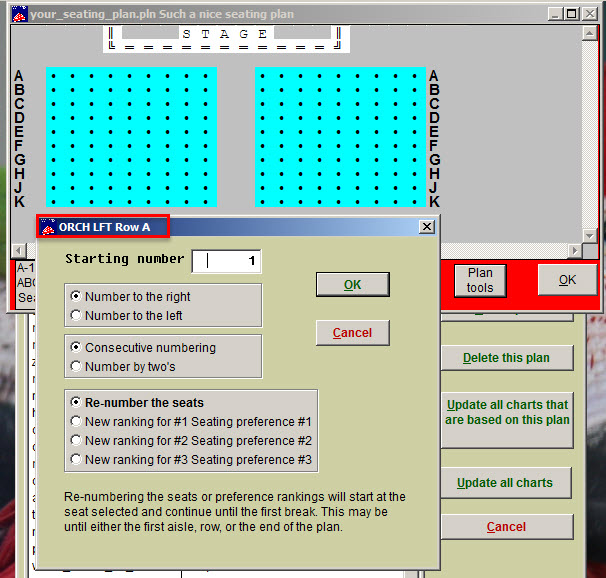
- Place your cursor on the seat where you wish the numbering to begin and click Plan tools | Re-number seats.
- Pick your starting number, and choose to number to the right or left, and whether to use consecutive numbering or to number by two’s.
- The New ranking radio buttons are used when you are setting up Best available seating.
- Delete records where status=’x’ to remove a row or column. This is used to make seating plans smaller. Learn more.
- All of these buttons are used to make your seating plan bigger. Click here to learn more.
- Add a row to the top of the plan
- Add a row to the bottom of the plan
- Add column to left side
- Add column to right side
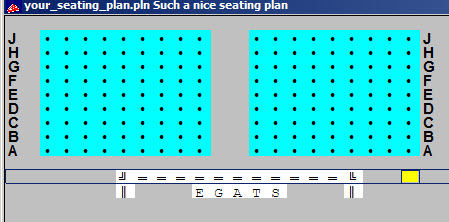
- Invert this plan
- This button is rarely used but it turns the seating plan upside down.
- If you invert the plan, you will need to retype any text so that it is not backwards.
The Re-assign tab
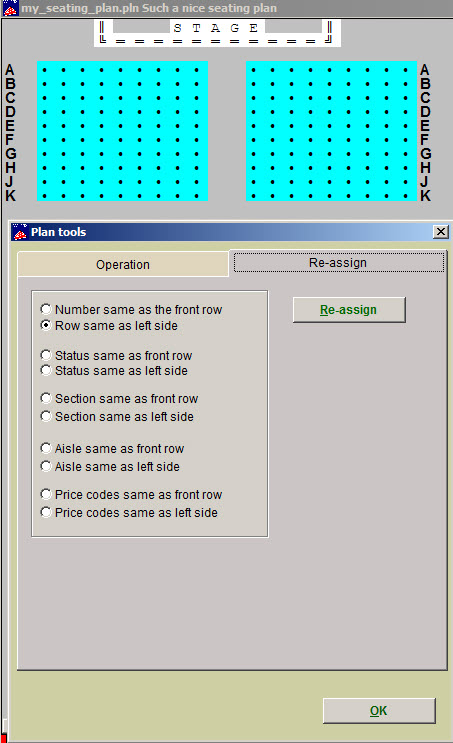
The Re-assign tab variables are designed to make it quick and easy to perform various operations.
NOTE: Wintix will look in either the very TOP row in the plan or the cells to the far left if you instruct it to re-assign something. In the case above, it will NOT work if we told Wintix to Number same as the front row for example. Since Wintix looks at the top row, it will only find letters to make up the word STAGE and two double vertical bars. There are NO seat numbers until Row A.
TIP: Any re-assignment should be done before the plan is cleaned up and descriptive text is added to the top or before any extra columns are added to the far left.